Table of Contents
RDoc
- RDoc - narzedzie, ktore przeglada pliki zrodlowe Rubiego, i na ich podstawie generuje dokumentacje HTML. Podobnie jak w przypadku phpdoc, konieczne jest stosowanie sie do pewnych form komentarzy.
# rdoc.rb

# This class stores information about people.
class Person
    attr_accessor :name, :age, :gender

    # Create the person object and store their name
    def initialize(name)
        @name = name
    end

    # Print this person's name to the screen
    def print_name
        puts "Person called #{@name}"
    end

end
Uruchamiamy RDoca:
sqbell@sqbell-gentoo ~/ruby/beginning_ruby/ch08_doctestdebug.rb $ rdoc rdoc.rb
Parsing sources...
100% [ 1/ 1]  rdoc.rb

Generating Darkfish...

Files:         1
Classes:       1 (    0 undocumented)
Constants:     0 (    0 undocumented)
Modules:       0 (    0 undocumented)
Methods:       2 (    0 undocumented)
100.00% documented

Elapsed: 0.0s
sqbell@sqbell-gentoo ~/ruby/beginning_ruby/ch08_doctestdebug.rb $ ls -la doc/
razem 44
drwxr-xr-x 2 sqbell sqbell  4096 05-05 17:35 .
drwxr-xr-x 3 sqbell sqbell  4096 05-05 17:35 ..
-rw-r--r-- 1 sqbell sqbell  6726 05-05 17:35 Person.html
-rw-r--r-- 1 sqbell sqbell    72 05-05 17:35 created.rid
-rw-r--r-- 1 sqbell sqbell  1459 05-05 17:35 index.html
-rw-r--r-- 1 sqbell sqbell 12560 05-05 17:35 rdoc.css
-rw-r--r-- 1 sqbell sqbell  1240 05-05 17:35 rdoc_rb.html
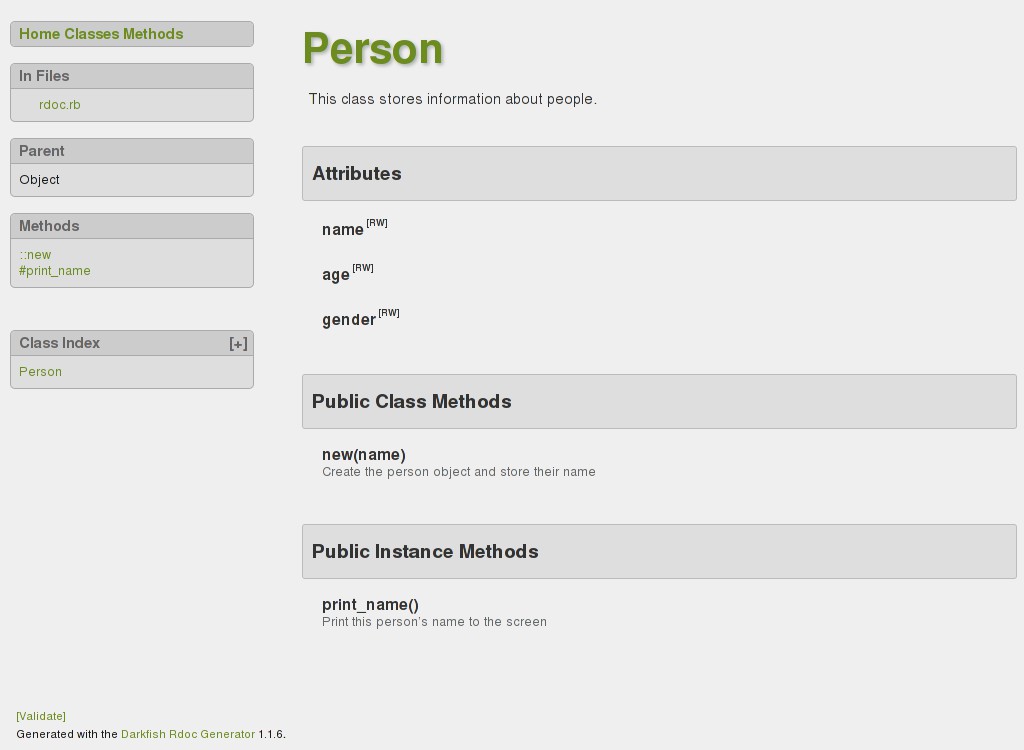
Bardzo ladnie to wyglada. ![]()
- Zeby RDoc cos zignorowal, korzystamy z modyfikatora
:nodoc:po definicji modulu, klasy czy metody:
def secret_method #:nodoc:
end
- Jesli chcemy, aby
:nodoc:obowiazywal od wystapienia do wszystkiego ponizej (ale wewnatrz), na przyklad aby wszystkie metody ponizej byly ukrywane, korzystamy z:nodoc: all. Jesli inna klasa bedzie zdefiniowana ponizej, bedzie ona dolaczona do dokumentacji. - Jesli nie chcemy, by czesc komentarzy byla przetwarzana przez RDoca, korzystamy z
#++i#--:
# I think that John is pretty
#--
# stupid fella.
#++
# and I really like him.
- RDoc nie przetwarza komentarzy wewnatrz metod.
- Za pomoca opcji linii komend, mozna wyeksportowac dokumentacje do roznych formatow (xml, yaml, chm, pdf):
–fmt <format name>
Obsługa błędów
# exceptions_01.rb

class Person
    def initialize(name)
        raise ArgumentError, "No name present!" if name.empty?
    end
end

fred = Person.new('')
Output:
exceptions_01.rb:5:in `initialize': No name present! (ArgumentError)
	from exceptions_01.rb:9:in `new'
	from exceptions_01.rb:9:in `<main>'
- Mozna tworzyc wlasne wyjatki. Robi sie to gdyz, dzieki temu mozna roznie radzic sobie z roznymi wyjatkami.
- Wyjatki obsluguje sie za pomoca slowa
rescue(orazbeginiend):
# exceptions_02.rb

begin
    puts 10 / 0
rescue
    puts "You caused an error!"
end
- Podobnie obsluguje sie kilka wyjatkow:
# exceptions_03_ps.rb

begin
    #code here
rescue ZeroDivisionError
    #code here
rescue YourOwnException
    #code here
rescue
    #code that rescues all other types of exception
end
- Poza obslugiwaniem, mozna tez otrzymywac wyjatki i ich uzywac:
# exceptions_04.rb

begin
    puts 10 / 0
rescue => e
    puts e.class
    puts e.backtrace
end
Output:
ZeroDivisionError
exceptions_04.rb:4:in `/'
exceptions_04.rb:4:in `<main>'
Catch i Throw
- Czasem fajnie by bylo moc przerwac wykonywanie jakiejs, na przyklad, petli podczas normalnej pracy w podobny sposob jak dzieje sie to z wyjatkami, ale bez faktycznego generowania bledu. Do tego wlasnie przydaja sie
catchithrow. - Dzialaja z symbolami a nie z wyjatkami.
# catch_throw_2.rb

def generate_random_number_except_123
    x = rand(1000)
    throw :finish if x == 123
end

catch(:finish) do
    1000.times { generate_random_number_except_123 }
    puts "Generated..."
end
Debugger
- debuggera uruchamiamy za pomoca polecenia
ruby -r debug debugfile.rb. To przeniesie nas do konsoli podobnej doirb:
Debug.rb
Emacs support available.

debugtest.rb:3:i = 1
(rdb:1)
- Za pomoca specjalnych polecen, mozna wykonywac program linia po linii, lub ustawic szereg breakpointow.
- Polecenie
listwyswietla linie programu, nad ktorymi aktualnie pracuje:
(rdb:1) list
[-2, 7] in debugtest.rb
   1  # debugtest.rb
   2
=> 3  i = 1
   4  j = 0
   5
   6  until i > 1000000
   7      i *= 2
stepprzechodzi do nastepnej linii programu,contwykonuje caly program bez krokow,breakustawia breakpoint w pewnej linii:break 3ustawia breakpoint na linii 3,watchustawia warunkowy breakpoint, zamiast linii wykorzystujemy tu jakis warunek:watch x > 10,quitwychodzi z debuggera,- wpisujac nazwe zmiennej, wyswietlamy jej zawartosc.
Testowanie
- Test-driven development - najpierw testy, pozniej kod, iteracyjnie.
# testing.rb

class String
    def titleize
        self.gsub(/\b\w/) { |letter| letter.upcase }
    end
end

raise "Fail 1" unless "this is a test".titleize == "This Is A Test"
raise "Fail 2" unless "another test 1234".titleize == "Another Test 1234"
raise "Fail 3" unless "We're testing titleize".titleize == "We're Testing Titleize"
Output:
testing.rb:11:in `<main>': Fail 3 (RuntimeError)
Testy jednostkowe
- Mozna testowac jak wczesniej, ale kiedy liczba testow rosnie, brak osobnego miejsca na testy i robi sie balagan.
Test::Unitto biblioteka Rubego do testow jednostkowych. Polegaja one na testowaniu kazdej indywidualnej jednostki funkcjonalnosci w programie lub systemie.Test::Unitudostepnia ustandaryzowany framework dla pisania i wykonywania testow.
# unit_testing.rb

class String
    def titleize
        self.gsub(/(\A|\s)\w/) { |letter| letter.upcase }
    end
end

require 'test/unit'

class TestTitleize < Test::Unit::TestCase
    def test_basic
        assert_equal("This Is A Test", "this is a test".titleize)
        assert_equal("Another Test 1234", "another test 1234".titleize)
        assert_equal("We're Testing", "We're testing".titleize)
    end
end
Output:
Loaded suite unit_testing
Started
.
Finished in 0.000407 seconds.

1 tests, 3 assertions, 0 failures, 0 errors, 0 skips

Test run options: --seed 26015
| asserty | co porownuje |
|---|---|
assert(<boolean expression>) | |
assert_equal(expected, actual) | |
assert_not_equal(expected, actual) | |
assert_raise(exception_type, ..) { <code block> } | |
assert_nothing_raised(exception_type, ..) { } | |
assert_instance_of(class_expected, object) | |
flunk:flunk |
Benchmarki i profilowanie
Benchmarki
# simple_bench.rb

require 'benchmark'

puts Benchmark.measure { 10000.times { print "." } }
Output:
0.020000 0.010000 0.030000 ( 0.026244)
Kolumny to kolejno: user CPU time, system CPU time, total CPU, real time taken.
measureprzyjac moze rowniez blok kodu.- gdy pomiarow jest wiecej, poradzic sobie mozemy za pomoca metody
bm:
# multiple_bench.rb

require 'benchmark'
iterations = 1000000

Benchmark.bm do |bm|
    bm.report("for:") do
        for i in 1 .. iterations do
            x = i
        end
    end

    bm.report("times:") do
        iterations.times do |i|
            x = i
        end
    end
end
Output:
        user     system      total        real
for:    0.110000   0.000000   0.110000 (  0.108295)
times:  0.090000   0.000000   0.090000 (  0.096391)
bmbm(10)przeprowadza test dziesięciokrotnie (w pewnych sytuacjach, CPU caching, memory caching i inne moga przeklamac wyniki).
Profilowanie
W Rubym profiler jest wbudowany. Jedyne co trzeba zrobic to umiescic require “profile” w kodzie, lub uruchomic go poleceniem ruby -r profile.
# profiling.rb

require 'profile'

class Calculator
    def self.count_to_large_number
        x = 0
        100000.times { x += 1 }
    end

    def self.count_to_small_number
        x = 0
        1000.times { x += 1 }
    end
end

Calculator.count_to_large_number
Calculator.count_to_small_number
Output:
  %   cumulative   self              self     total
 time   seconds   seconds    calls  ms/call  ms/call  name
100.00     0.18      0.18        2    90.00    90.00  Integer#times
  0.00     0.18      0.00        1     0.00     0.00  Class#inherited
  0.00     0.18      0.00        2     0.00     0.00  BasicObject#singleton_method_added
  0.00     0.18      0.00        1     0.00   180.00  Calculator#count_to_large_number
  0.00     0.18      0.00        1     0.00     0.00  Calculator#count_to_small_number
  0.00     0.18      0.00        1     0.00   180.00  #toplevel
- W odroznieniu do benchmarkow, profiling powaznie obciaza szybkosc dzialania programu. Pomimo tego, spowolnienie jest spojne, a wyniki pewne.
- Pierwsza kolumna to procent czasu spedzonego w danej metodzie. Druga kolumna pokazuje ten sam parametr jako czas w sekundach. Trzecia to liczba wywolan danej metody.
- Aby profilowac tylko pewna czesc kodu, mozna skorzystac z biblioteki
profiler. Sekcje profilowana ustawiamy wtedy za pomoca polecenProfiler__.start_profileiProfiler__.stop_profile.Profiler__.print_profile($stdout)w odpowiednich miejscach.
Profilowanie Garbage Collectora
GC::Profiler.enable

def factorial_iterative(n)
  (2 .. n - 1).each {|i| n *= i}
  n
end

m = 30_000

factorial_iterative(m)

puts GC::Profiler.result
Output:
GC 176 invokes.
Index    Invoke Time(sec)       Use Size(byte)     Total Size(byte)         Total Object                    GC Time(ms)
    1               0.035               179400               703480                17587         1.95800000000000151701
    2               0.054               179400               703480                17587         1.37900000000001909939
    3               0.071               179400               703480                17587         1.40599999999999059064
    4               0.088               179400               703480                17587         1.25100000000000211031
    5               0.104               179400               703480                17587         1.23499999999998610889
    6               0.120               179400               703480                17587         1.21299999999999186251
    7               0.136               179400               703480                17587         1.22200000000000086331
    8               0.152               179400               703480                17587         1.15599999999999036859
    9               0.168               179400               703480                17587         1.21299999999996410693
   10               0.183               179400               703480                17587         1.19400000000002837197
[...]
Kilka przykładów optymalizacji
Hash a Array
#!/usr/bin/env ruby -wKU
require 'benchmark'

paragraph = %w[Lorem ipsum dolor sit amet consectetur adipisicing elit sed do eiusmod tempor incididunt ut labore et dolore magna aliqua Ut enim ad minim veniam quis nostrud exercitation ullamco laboris nisi ut aliquip ex ea commodo consequat Duis aute irure dolor in reprehenderit in voluptate velit esse cillum dolore eu fugiat nulla pariatur Excepteur sint occaecat cupidatat non proident sunt in culpa qui officia deserunt mollit anim id est laborum]*100
words_ary = []
words_hsh = {}

Benchmark.bm(10) do |b|
  b.report("array") { paragraph.each {|word| words_ary << word unless words_ary.include?(word)} }
  b.report("uniq") {paragraph.uniq}
  b.report("hash") do
    paragraph.each {|word| words_hsh[word] = nil}
    words_hsh = words_hsh.keys
  end
end
Output:
                 user     system      total        real
array        0.040000   0.000000   0.040000 (  0.046044)
uniq         0.010000   0.000000   0.010000 (  0.002790)
hash         0.000000   0.000000   0.000000 (  0.005029)
[Finished in 0.1s]
Powodem takich różnic jest fakt, że przy dodawaniu do tablicy, słowo musi być sprawdzone z każdym elementem tablicy. W przypadku słownika, nie jest to konieczne. Wygrywa metoda Array#uniq.
Lazy Instantiation
#!/usr/bin/env ruby -wKU
require 'benchmark'

class Employee
  def initialize
    @embezzled = []
  end

  def embezzle(amount)
    @embezzled << amount
  end

  def embezzled_total
    @embezzled.inject(0) {|sum, amount| sum + amount}
  end
end

class FairEmployee
  def embezzle(amount)
    (@embezzled ||= []) << amount
  end

  def embezzled_total
    (@embezzled || []).inject(0) {|sum, amount| sum + amount}
  end
end

EMPLOYEES = 1000000

Benchmark.bmbm(15) do |b|
  b.report("empl") { EMPLOYEES.times {Employee.new} }
  b.report("fair") { EMPLOYEES.times {FairEmployee.new} }
end
Output:
Rehearsal ---------------------------------------------------
empl              1.490000   0.000000   1.490000 (  1.522579)
fair              0.960000   0.000000   0.960000 (  0.971468)
------------------------------------------ total: 2.450000sec

                      user     system      total        real
empl              1.460000   0.010000   1.470000 (  1.489645)
fair              0.930000   0.000000   0.930000 (  0.944282)
[Finished in 5.0s]
W pierwszym wypadku, dla każdego obiektu tworzymy pustą tablicę, zakładając, że każdy pracownik będzie nieuczciwy. W drugim przypadku, tablica tworzona jest tylko, gdy faktycznie coś zostało zapodziane - oszczędzamy więc pamięć i czas procesora. Gdy jednak wielu pracowników byłoby nieuczciwych, każde wywołanie metod embezzle i embezzled_total będzie wolniejsze z powodu dodatkowych warunków.
Ccccccbooooom!
#!/usr/bin/env ruby -wKU

require "benchmark"
require "inline"

class Integer
  def count_set_bits(use_c = false)
    return csb(self) if use_c
    return 0 if self.zero?
    bits, x = 1, self
    bits += 1 while (x = x & (x - 1)).nonzero?
    bits
  end

  inline do |builder|
    builder.c "int csb(long x) {
      if (x == 0) return (x);
      int bits = 1;
      while ((x = x & (x - 1))) bits ++;
      return (bits);
    }"

  end
end

Benchmark.bmbm do |b|
  b.report("ruby") { 100_100.times { 152363.count_set_bits } }
  b.report("c") { 100_100.times { 152363.count_set_bits(true) } }
end
Output:
Rehearsal ----------------------------------------
ruby   0.620000   0.000000   0.620000 (  0.638407)
c      0.060000   0.000000   0.060000 (  0.071187)
------------------------------- total: 0.680000sec

           user     system      total        real
ruby   0.610000   0.000000   0.610000 (  0.655447)
c      0.070000   0.010000   0.080000 (  0.079884)
[Finished in 1.9s]
Czasem po prostu jest szybciej. Dzięki RubyInline, możemy umieszczać kod C bezpośrednio w Rubym. Można też wywoływać funkcje C jakby były częścią Rubego.
Ogólnie
- Przy konstruowaniu złożonych warunków, na początku warto dać najszybszą metodę,
- Algorytmy iteracyjne szybsze są od rekurencyjnych.